Recent Posts
How Landlords Can Protect Their Rentals from Water Damage
3/19/2025 (Permalink)
 Protect your rental property by staying proactive—and if water damage happens, contact SERVPRO of Marina Del Rey/Westchester/El Segundo today!
Owning a rental property comes with a long list of responsibilities, and water damage is one of the biggest risks to your investment. A small leak today could turn into an expensive repair tomorrow—especially if a tenant doesn’t report it right away. About 1 in 60 insured homes file a water damage or freezing claim each year, with an average payout of nearly $14,000.
The good news? There are ways to reduce the risk of water damage, avoid expensive damage, and keep your tenants happy. By staying proactive, you can prevent minor issues from turning into major headaches.
Regular Inspections
One of the best ways to protect your rental is to inspect it regularly. A quick check a couple of times a year can help you catch leaks, plumbing issues, or roof damage before they lead to bigger problems.
Pay special attention to areas that are more prone to water damage—like under sinks, around appliances, near the water heater, and in the basement or crawl space. If your property has older plumbing, consider having a professional check it every year to spot potential issues before they become emergencies.
Drainage & Gutters
A well-maintained drainage system can make all the difference in preventing water damage. If water isn’t properly directed away from the property, it can seep into the foundation and cause serious structural issues.
Make sure your gutters are clean and free of debris, especially before the rainy season. Downspouts should direct water at least a few feet away from the foundation. If you notice water pooling around the property after heavy rain, it might be time to adjust the landscaping or install a drainage system to keep excess water from becoming a problem.
Tenant Communication
Even with the best prevention methods in place, your tenants play a big role in protecting your rental. If they don’t report a leak or follow basic water damage prevention steps, small problems can go unnoticed for too long.
Consider adding a simple water damage prevention section in the lease agreement, outlining things like:
- Reporting leaks or plumbing issues as soon as they notice them.
- Avoid flushing anything other than toilet paper.
- Keep an eye out for slow drains or signs of water buildup.
Regular communication goes a long way. A quick reminder about leak prevention when signing or renewing a lease can help tenants feel responsible for the property’s upkeep.
Appliance & Plumbing Maintenance
A leaking appliance hose or an old water heater can cause just as much damage as a burst pipe. Regular maintenance can help avoid sudden failures.
If your rental has an older water heater, check for rust or corrosion and replace it before it fails. Washing machine hoses should be replaced every few years, and dishwasher connections should be inspected regularly.
If your property has multiple units, it’s especially important to keep up with plumbing maintenance. A leak in one apartment can quickly spread to the units below, turning a small issue into a much bigger (and more expensive) one.
What to Do If Water Damage Happens in Your Rental
Even with the best prevention, water damage can still happen. The key is acting fast. If a tenant reports a leak, don’t wait—send someone out to inspect it immediately. If there’s flooding or major damage, shut off the water supply and document everything before calling a professional.
It’s also a good idea to have an emergency plan in place. Make sure tenants know where the main water shutoff valve is and provide them with emergency contacts for after-hours situations. Being prepared can make all the difference in minimizing damage and repair costs.
Top Questions About Protecting Your Rental from Water Damage
How often should I inspect my rental for water damage?
At least twice a year—before and after rainy seasons. If your property is older or has had water damage in the past, more frequent checks are a good idea.
Are landlords always responsible for water damage repairs?
Not necessarily. If the damage is caused by a structural issue or plumbing failure, it’s usually the landlord’s responsibility. However, if the tenant’s negligence caused the issue (like an overflowing bathtub or failing to report a small leak), they might be held accountable.
Can I require tenants to report leaks in the lease?
Yes, and it’s a smart move. Adding a water damage prevention clause in the lease can make it clear that tenants must report leaks and plumbing issues immediately.
What’s the first thing I should do if my rental has water damage?
First, stop the water at the source. Then, document the damage with photos and contact a professional water damage restoration company like SERVPRO of Marina Del Rey/Westchester/El Segundo to handle the cleanup and repairs.
Call SERVPRO of Marina Del Rey/Westchester/El Segundo for Water Damage Restoration
Even with the best prevention strategies, water damage can still happen. When it does, fast action is critical. At SERVPRO of Marina Del Rey/Westchester/El Segundo, we specialize in:
- Emergency water extraction & drying
- Structural repairs after water damage
- Mold prevention & cleanup
- 24/7 response for water damage emergencies
Protect your rental property by staying proactive—and if water damage happens, contact SERVPRO of Marina Del Rey/Westchester/El Segundo for expert restoration.
Creating a Family Fire Safety Plan: Essential Steps for Preparedness
12/12/2024 (Permalink)
House fires can happen unexpectedly, and the best defense is preparation. A comprehensive fire safety plan helps ensure that everyone in your family knows what to do if a fire occurs, reducing the risk of injury and allowing for a swift, safe escape. Here’s how to create a family fire safety plan that prepares your household for any fire emergency.
1. Identify and Test Exits
Identify all exits from your home, including windows and doors. Walk through each room to determine the best way out in case a door is blocked by smoke or flames. Make sure all windows and doors are easy to open and check that windows aren't obstructed by furniture or sealed shut. Ensure that escape routes are kept clear of obstacles, so they're accessible in an emergency.
2. Install Smoke Alarms and Test Regularly
Smoke alarms are crucial for early fire detection. Install alarms in each bedroom, outside every sleeping area, and on each level of your home, including the basement. Test smoke alarms monthly to make sure they’re functioning properly, and replace batteries as needed. Smoke alarms should be entirely replaced every 10 years. Keeping these in good working order can provide the crucial few minutes needed to safely escape.
3. Choose a Meeting Place
Choose an outdoor meeting place a safe distance from your home, such as a neighbor’s house, mailbox, or a specific tree. Make sure everyone in the family knows this location so they can meet there in the event of a fire. A designated meeting spot helps to quickly account for everyone and communicate with first responders without re-entering the house.
4. Practice Your Escape Plan
Practice makes perfect! Conduct regular fire drills at least twice a year to make sure everyone knows how to get out safely and quickly. During a drill, practice different scenarios, such as escaping from each room and testing different escape routes. Remind everyone to “Stay Low and Go” by crawling under smoke, as smoke tends to rise and can make breathing difficult.
5. Teach Fire Safety Protocols
In addition to the escape plan, teach children basic fire safety practices. They should understand the importance of not hiding during a fire, staying low to avoid smoke inhalation, and how to “Stop, Drop, and Roll” if their clothes catch fire. Remind them never to go back into a burning building to retrieve personal belongings or pets.
6. Keep Emergency Contacts Handy
Write down emergency contact numbers, such as 911 and nearby family members or neighbors, and keep them in an easily accessible spot. Make sure everyone in the family knows how to use a phone to call for help.
7. Review and Update Regularly
Family dynamics and home layouts can change, so it’s essential to review your fire safety plan regularly. Ensure any new family members, like younger children, understand the plan as they grow. By taking these steps, you’ll give your family the tools and knowledge to act swiftly in the event of a fire. Preparedness is a powerful tool in reducing the potential dangers of fire, keeping your loved ones safe, and bringing peace of mind.
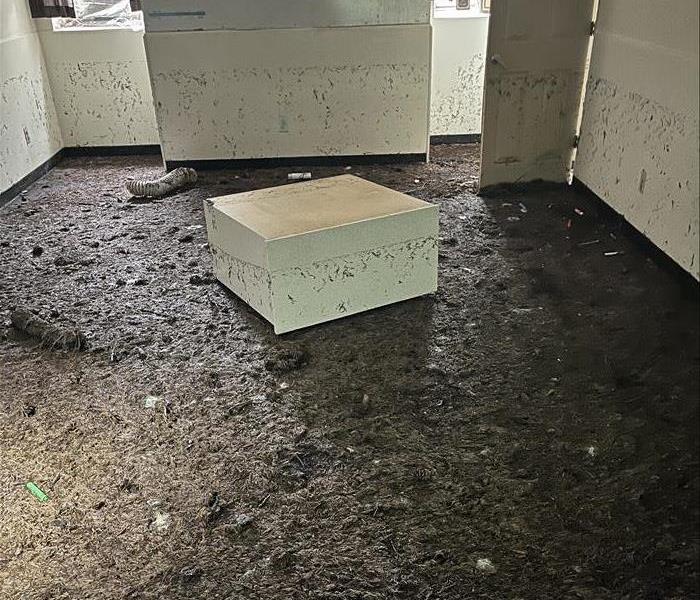
Tenant and Landlord Responsibilities for Mold Prevention in Rental Properties
11/15/2024 (Permalink)
Mold is a common issue in rental properties, often caused by moisture and inadequate ventilation. When mold appears, it’s important to address it quickly to prevent damage and ensure a safe living environment. Both tenants and landlords play a role in preventing and managing mold growth, and understanding these responsibilities can help keep the property safe and well-maintained.
Tenant Responsibilities
Tenants play a significant role in preventing mold by maintaining a clean and well-ventilated living space. While landlords are responsible for structural issues, tenants need to take everyday precautions to avoid creating an environment where mold can thrive.
- Report Water Damage Promptly: Mold thrives in damp areas, often caused by leaks or water damage. If a tenant notices any leaks, condensation, or damp areas in the property, they should immediately notify the landlord. This helps prevent mold from taking root in areas like ceilings, walls, or floors.
- Proper Ventilation: Tenants should ensure that areas prone to moisture, such as bathrooms and kitchens, are properly ventilated. This can be as simple as using exhaust fans, opening windows, or wiping down damp surfaces to reduce humidity levels in these spaces.
- Regular Cleaning: Keeping areas like bathrooms, kitchens, and laundry rooms clean and dry is essential in preventing mold. Mold can grow on various surfaces, including tile, wood, and fabric, if left unchecked. Tenants should also keep furniture away from walls to promote airflow and reduce condensation buildup.
- Avoid Overwatering Indoor Plants: Mold can develop in damp soil, which can spread to nearby areas in the home. Tenants should be cautious when watering indoor plants and ensure that water doesn’t pool on floors or furniture.
Landlord Responsibilities
Landlords have a legal obligation to provide a habitable living space, which includes addressing mold issues that stem from structural problems, leaks, or poor maintenance. Failing to address mold problems can lead to property damage, tenant dissatisfaction, or even legal action.
- Respond to Maintenance Requests Quickly: If a tenant reports a water leak, condensation, or signs of mold, landlords must respond promptly. Ignoring these issues can lead to further damage.
- Maintain Building Structures: Mold growth often occurs due to faulty structures, such as leaky roofs, damaged plumbing, or poor ventilation systems. Landlords should regularly inspect and maintain the property to prevent moisture from seeping into walls, ceilings, or floors.
- Professional Mold Remediation: If mold becomes a serious issue, landlords should seek the services of professionals like SERVPRO®. Attempting to handle mold without the proper equipment or expertise can result in incomplete removal or the spread of spores to other areas. SERVPRO provides thorough mold remediation services, ensuring that the problem is fully addressed and doesn’t return.
- Install Proper Ventilation: Landlords can help prevent mold by ensuring that bathrooms, kitchens, and laundry areas are properly ventilated. Installing exhaust fans or making sure windows can open will help tenants manage moisture levels.
Working Together to Prevent Mold
Mold prevention is a shared responsibility. Tenants should practice good cleaning habits and promptly report any signs of water damage or mold, while landlords need to act quickly and ensure that the property is well-maintained. Working together not only prevents mold but also ensures a positive tenant-landlord relationship.
When mold does appear, it’s essential to act quickly and involve professionals like SERVPRO of Marina Del Rey/Westchester/El Segundo. With advanced mold remediation techniques, SERVPRO can safely remove mold from rental properties and help identify any underlying moisture problems. By addressing the issue at its source, SERVPRO ensures that mold is eliminated and prevented from returning, protecting both the property and its occupants.
The Step-by-Step Process of Water Damage Restoration
10/16/2024 (Permalink)
 If you ever find yourself facing water damage, trust the professionals at SERVPRO of Marina Del Rey/Westchester/El Segundo
Water damage can wreak havoc on your property, causing significant damage to structures and belongings. When disaster strikes, a prompt and professional response is essential to mitigate further damage and begin the restoration process. In this blog, we’ll walk you through the step-by-step process of water damage restoration, offering expert insights from SERVPRO® of Marina Del Rey/Westchester/El Segundo. Our goal is to help you understand what to expect and how our proven methods ensure a successful restoration.
Step 1: Immediate Response and Assessment
The first crucial step in water damage restoration is the immediate response. Time is of the essence, as water can quickly spread, affecting everything from flooring to walls and furniture. When you contact SERVPRO of Marina Del Rey/Westchester/El Segundo, our team responds swiftly, typically within hours. According to the Insurance Information Institute, water damage is the second most common cause of property loss, accounting for around 29% of all homeowner insurance claims in the U.S. (source).
Upon arrival, our certified technicians conduct a thorough assessment of the affected area. This includes identifying the source of water intrusion, categorizing the water type (clean, gray, or black), and evaluating the extent of the damage. This assessment is critical for developing a customized restoration plan tailored to your specific needs.
Step 2: Water Extraction and Removal
Once the assessment is complete, the next step is to remove standing water. The longer water remains in your property, the more extensive the damage becomes. Our team uses advanced equipment, including powerful pumps and industrial-grade wet/dry vacuums, to extract water quickly and efficiently. We focus on removing as much water as possible to expedite the drying process and minimize further damage.
Step 3: Drying and Dehumidification
After water extraction, the affected areas will still retain moisture, which can lead to mold growth and structural damage if not properly addressed. Our team employs specialized drying equipment, such as high-speed air movers and dehumidifiers, to thoroughly dry the affected spaces. We monitor moisture levels throughout the process using hygrometers and thermal imaging cameras to ensure that all areas are completely dry.
Step 4: Cleaning and Sanitizing
Water damage often brings contaminants, especially if the water is classified as gray or black water. To ensure the safety and cleanliness of your property, we perform a comprehensive cleaning and sanitizing process. This includes cleaning and disinfecting all affected surfaces, belongings, and furniture. We also use air scrubbers and antimicrobial treatments to eliminate any potential odors and contaminants, ensuring that your home or business is safe and healthy.
Step 5: Restoration and Repair
The final step in the water damage restoration process is restoring your property to its pre-damage condition. Depending on the extent of the damage, this can range from minor repairs, such as replacing drywall and installing new carpet, to more extensive reconstruction projects. SERVPRO of Marina Del Rey/Westchester/El Segundo has the expertise and resources to handle all aspects of the restoration process, ensuring a seamless transition from damage to recovery.
The Importance of Professional Water Damage Restoration
While some homeowners may attempt DIY water damage restoration, professional services offer significant advantages. Our team is equipped with the latest technology, industry knowledge, and experience to handle even the most challenging restoration projects. Additionally, professional restoration helps prevent secondary damage, such as mold growth and structural deterioration, which can result in higher repair costs if not addressed promptly.
Why Choose SERVPRO of Marina Del Rey/Westchester/El Segundo?
At SERVPRO of Marina Del Rey/Westchester/El Segundo, we pride ourselves on our commitment to excellence, expertise, and customer satisfaction. Our team is trained and certified in water damage restoration, and we adhere to the highest industry standards. We understand the emotional and financial impact that water damage can have on your life, and we are dedicated to making the restoration process as smooth and stress-free as possible.
Final Thoughts: Protecting Your Property from Water Damage
Water damage is an unfortunate reality for many homeowners and businesses, but with prompt action and professional restoration services, you can minimize the damage and restore your property efficiently. Remember, the key to successful water damage restoration is quick response, thorough drying, and expert repair. If you ever find yourself facing water damage, trust the professionals at SERVPRO of Marina Del Rey/Westchester/El Segundo to bring your property back to its original condition.
For more information or to schedule a consultation, contact us today. Our team is ready to assist you 24/7, providing the expert care your property deserves.
DIY vs. Professional Services: Making the Right Choice for Storm Damage Restoration
9/18/2024 (Permalink)
When a storm hits, it can leave a trail of destruction in its wake. From water damage to broken windows and compromised roofs, the aftermath can be overwhelming. The big question for many homeowners is whether to tackle the restoration process themselves or hire professional services. In this blog, we’ll explore the pros and cons of DIY storm damage restoration versus professional services, and why SERVPRO® is a trusted choice for storm damage recovery.
DIY Storm Damage Restoration
Pros:
- Cost Savings: One of the main reasons homeowners opt for DIY restoration is to save money. By handling repairs yourself, you can avoid labor costs associated with hiring professionals.
- Immediate Action: You can start the restoration process immediately without waiting for a professional service to arrive. This can be crucial for preventing further damage, especially in cases of water intrusion.
- Personal Control: DIY restoration allows you to have complete control over the process, ensuring that every step meets your standards and expectations.
Cons:
- Lack of Expertise: Most homeowners do not have the specialized knowledge or skills required for effective storm damage restoration. This can lead to incomplete or improper repairs, which can cause more problems down the line.
- Safety Risks: Storm damage can create hazardous conditions, such as weakened structures, exposed electrical wiring, and mold growth. Without proper training and equipment, addressing these risks can be dangerous.
- Time-Consuming: DIY restoration can be incredibly time-consuming, especially if you have other responsibilities. It can take much longer to complete the work compared to professionals who have experience and efficiency on their side.
Professional Storm Damage Restoration
Pros:
- Expertise and Experience: Professional restoration services, like SERVPRO, have the expertise and experience to handle all aspects of storm damage. They can identify hidden damage, use advanced techniques, and ensure thorough and effective repairs.
- Safety and Proper Equipment: Professionals have the necessary equipment and training to safely handle hazardous situations. This reduces the risk of injury and ensures that the job is done correctly.
- Efficiency: Professional teams can complete the restoration process much faster than DIY efforts. This means you can return to your normal life sooner and minimize the disruption caused by the storm.
- Insurance Assistance: Many professional restoration services work directly with insurance companies to help manage claims. This can simplify the process for homeowners and ensure that all necessary repairs are covered.
Cons:
- Cost: Hiring professional services can be more expensive than DIY. However, the investment often pays off in terms of quality and peace of mind.
- Scheduling: You may need to wait for a professional service to be available, especially after a widespread storm event when many homes are affected.
Why Choose SERVPRO for Storm Damage Restoration?
SERVPRO is a trusted leader in storm damage restoration, offering comprehensive services to help homeowners recover quickly and efficiently. Here’s why SERVPRO is the right choice.
Storm damage can happen at any time, and SERVPRO of Marina Del Rey/Westchester/El Segundo is always ready to respond. Their 24/7 emergency service ensures that help is available when you need it most. SERVPRO’s team consists of certified and highly trained professionals who understand the complexities of storm damage restoration.
While DIY storm damage restoration may seem like a cost-effective solution, the risks and challenges often outweigh the benefits. Professional services like SERVPRO offer the expertise, safety, and efficiency needed to properly restore your home. When storms strike, trust SERVPRO to help you recover quickly and effectively.
Staying Warm Safely: How to Use Space Heaters Without the Risk
8/13/2024 (Permalink)
As temperatures drop, space heaters become a popular solution for adding warmth to specific areas of the home. While these devices can be effective, they also pose significant safety risks if not used properly. Understanding the dangers associated with space heaters and following safety guidelines can prevent fires and injuries. This blog will outline the risks and provide practical tips on how to use space heaters safely.
The Dangers of Space Heaters
- Fire Hazard
- Overheating: Space heaters can overheat if left on for extended periods or if they malfunction, increasing the risk of fire.
- Combustible Materials: Placing space heaters too close to flammable objects like curtains, bedding, furniture, and papers can cause these items to ignite.
- Electric Shock
- Faulty Wiring: Damaged cords or improper use of extension cords can lead to electrical shocks or fires.
- Water Exposure: Using space heaters in damp areas like bathrooms can increase the risk of electric shock.
- Carbon Monoxide Poisoning
- Fuel-Burning Heaters: Space heaters that burn fuel, such as kerosene or propane, can produce carbon monoxide, a colorless, odorless gas that can be deadly if inhaled in large quantities.
- Burns and Injuries
- Direct Contact: The surfaces of space heaters can become extremely hot, posing a burn risk to anyone who touches them, especially children and pets.
- Tipping Over: Unstable heaters can tip over easily, leading to burns or starting a fire.
How to Use Space Heaters Safely
- Choose the Right Space Heater
- Safety Features: Select a space heater with built-in safety features such as tip-over protection, overheat protection, and automatic shut-off.
- Certified Models: Purchase heaters that have been tested and certified by recognized safety organizations like Underwriters Laboratories (UL).
- Proper Placement
- Keep Clear: Place the heater on a flat, stable surface and keep it at least three feet away from flammable materials.
- Avoid High-Traffic Areas: Position the heater where it won't be easily knocked over by foot traffic, pets, or children.
- Use Correct Power Source
- Direct Plug-In: Plug the heater directly into a wall outlet rather than using an extension cord or power strip, which can overheat and cause a fire.
- Dedicated Circuit: Use a dedicated circuit for your space heater to prevent overloading your home's electrical system.
- Monitor Usage
- Never Leave Unattended: Turn off the heater when you leave the room or go to bed.
- Regular Inspections: Check the heater and its cord regularly for signs of damage or wear.
- Ventilation for Fuel-Burning Heaters
- Proper Ventilation: Ensure that fuel-burning heaters are well-ventilated to prevent the buildup of dangerous fumes.
- Carbon Monoxide Detectors: Install carbon monoxide detectors in your home to alert you to dangerous levels of the gas.
- Keep Away from Water
- Dry Areas Only: Never use space heaters in wet or damp areas like bathrooms or kitchens, as this increases the risk of electric shock.
- Educate Family Members
- Safety Awareness: Teach all household members, including children, about the dangers of space heaters and the importance of not touching or playing near them.
Space heaters can be a convenient way to add warmth to your home, but they come with significant risks if not used properly. By choosing the right heater, placing it safely, using the correct power source, monitoring its usage, ensuring proper ventilation for fuel-burning models, keeping it away from water, and educating your family, you can enjoy the comfort of a space heater while minimizing the dangers. Always prioritize safety to protect your home and loved ones from the potential hazards associated with space heaters.
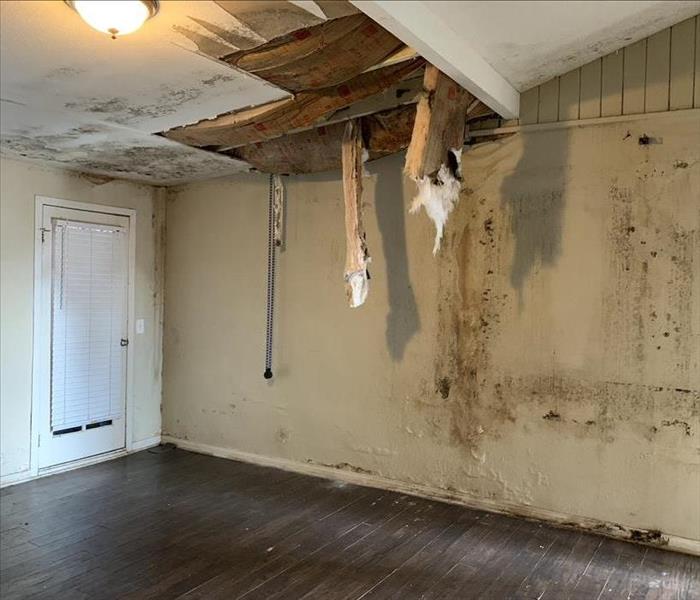
Understanding the Connection Between Water Damage and Mold
7/17/2024 (Permalink)
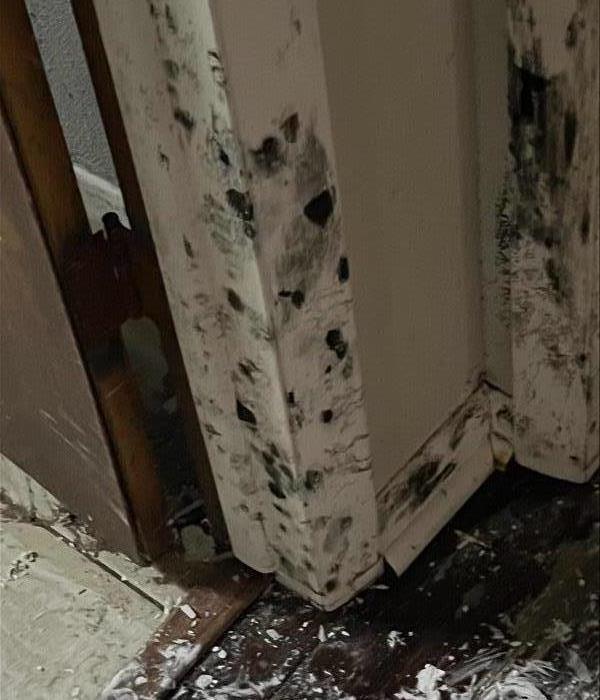 Understanding the link between water damage and mold is crucial for homeowners.
Water damage and mold often go hand in hand. When water infiltrates your home, it creates the perfect environment for mold growth. Understanding this link can help you take proactive steps to prevent mold after experiencing water damage. In this blog, we will discuss how water damage leads to mold growth, the importance of quick action, and tips to prevent mold development.
How Water Damage Leads to Mold Growth
Mold thrives in damp, humid environments. When water damage occurs, whether from a burst pipe, flooding, or a leaking roof, it introduces moisture into your home. Here’s how this process unfolds:
- Moisture Accumulation
When water enters your home, it seeps into porous materials like wood, drywall, and carpeting. These materials absorb water, creating a moist environment that is ideal for mold spores to settle and grow. Moisture accumulation is the first and most crucial step in mold formation. If left unchecked, these damp materials can support extensive mold colonies.
- Humidity Increase
Water damage often leads to increased humidity levels in your home. High humidity creates condensation on surfaces, adding to the moisture content. Mold needs only 24-48 hours to start growing in such conditions. Even small increases in humidity can create a conducive environment for mold, particularly in enclosed spaces like basements, attics, and behind walls.
- Lack of Ventilation
Water-damaged areas often suffer from poor ventilation. Stagnant air prevents moisture from evaporating, allowing mold to take hold and spread. Proper ventilation is key to drying out water-damaged areas and preventing mold growth. Without adequate airflow, damp areas remain wet for longer periods, allowing mold spores to grow and spread.
- Temperature Conditions
Mold grows best in warm temperatures, typically between 77°F and 86°F (25°C to 30°C), but it can grow in a wide range of temperatures. After water damage, if the temperature in your home is within this range, mold growth can accelerate. Controlling indoor temperatures can be a crucial factor in mitigating mold risk.
- Time Factor
Mold can begin to grow within 24-48 hours after water damage occurs. The longer the water remains, the more extensive the mold growth can become. Immediate action is crucial to prevent mold from taking hold. Quick drying and dehumidifying are essential to reduce the window of opportunity for mold growth.
- Organic Materials
Homes are filled with organic materials that mold can feed on, such as wood, paper, and certain types of insulation. When these materials get wet, they provide the nutrients mold needs to thrive. Ensuring these materials are dried thoroughly and quickly is vital in preventing mold proliferation.
The Importance of Quick Action
Quick action is crucial when dealing with water damage. The longer the water sits, the more likely mold will develop. Here are some reasons why an immediate response is essential:
- Preventing Mold Growth: Acting quickly can prevent mold spores from germinating. Drying out the affected areas within 24-48 hours significantly reduces the chance of mold growth.
- Reducing Damage: Prompt water removal and drying help minimize damage to your property. The less damage there is, the easier and cheaper it is to repair.
- Preserving Structural Integrity: Mold can compromise the integrity of your home’s structure, leading to costly repairs and safety hazards. Quick action ensures your home remains safe and structurally sound.
Understanding the link between water damage and mold is crucial for homeowners. Quick action and effective preventive measures can make a significant difference in preventing mold growth after water damage. If you experience water damage, acting quickly to remove water, dry affected areas, and monitor humidity levels can help keep your home mold-free. For severe water damage or mold issues, consider contacting a professional service like SERVPRO of Marina Del Rey/Westchester/El Segundo for expert assistance. Taking these steps ensures a safer, more comfortable living environment and protects your property from further damage.
Protecting Yourself During Water Damage Cleanup
6/12/2024 (Permalink)
 Our team takes protection seriously during the restoration and cleanup process.
Water damage can be a challenging experience for homeowners and property owners. Whether it's caused by a burst pipe, a leaking roof, or a severe weather event, prompt cleanup and restoration are essential to prevent further damage. During the cleanup process, it is crucial to prioritize your safety and well-being. In this blog, we will discuss important tips for protecting yourself during water damage cleanup to ensure a safe and effective restoration process.
Assessing the Situation
Before beginning the cleanup process, it is essential to assess the extent of the water damage. Identify the source of the water intrusion and determine whether it is safe to enter the affected area. If the damage is extensive or if there are safety concerns such as electrical hazards, it is advisable to seek professional help from water damage restoration experts.
Wearing Protective Gear
When dealing with water damage, wearing appropriate protective gear is crucial. Protective gear can help prevent exposure to potentially harmful contaminants and ensure your safety during the cleanup process. Some essential protective gear includes:
- Rubber gloves
- Rubber boots
- Safety goggles
- Disposable face masks
- Turning Off Utilities
Before starting the cleanup process, it is important to turn off utilities such as electricity and gas to prevent hazards. Water and electricity are a dangerous combination, so ensuring that the power is shut off before entering the affected area is critical for your safety.
Removing Standing Water
Removing standing water as quickly as possible is essential to prevent further damage and mold growth. Use a wet/dry vacuum, buckets, or pumps to extract water from the affected area. Be cautious when dealing with electrical appliances or wiring that may have been exposed to water.
Drying and Dehumidifying
After removing standing water, it is important to dry out the affected area thoroughly. Opening windows, and using fans, and dehumidifiers can help accelerate the drying process and prevent mold growth. Pay special attention to areas that are hard to reach or hidden from view, such as wall cavities and subfloors.
Cleaning and Disinfecting
Once the area is dry, thoroughly clean and disinfect all surfaces that came into contact with water. Use appropriate cleaning agents to sanitize and remove any contaminants or bacteria that may be present. Pay special attention to items that are porous and may need to be discarded if they cannot be effectively cleaned.
Monitoring for Mold
Even after cleanup and restoration efforts, it is important to monitor the affected area for signs of mold growth. Mold can develop quickly in humid environments and may pose risks to your proeprty. If you notice any signs of mold, consult with professional mold remediation experts to address the issue promptly.
In conclusion, protecting yourself during water damage cleanup is crucial for a safe and effective restoration process. By following safety precautions, wearing appropriate protective gear, and taking proactive steps to remove water and moisture, you can minimize risks and ensure a successful cleanup. If you require assistance with water damage restoration, contact SERVPRO® for professional and reliable restoration services.
Storm Damage Restoration: DIY vs. Professional Services
5/15/2024 (Permalink)
 In this blog, we explore the differences between DIY and professional storm damage restoration, helping you make an informed decision for your home.
When your home experiences storm damage, whether from severe wind, heavy rain, or other weather-related events, it's essential to restore it promptly and effectively. The question often arises as to whether to tackle the restoration as a DIY project or engage professional services. In this blog, we will explore the differences between DIY and professional storm damage restoration, helping you make an informed decision for your home.
DIY Storm Damage Restoration
Some homeowners may consider handling storm damage restoration on their own. While this may seem cost-effective, there are several factors to consider before choosing the DIY route:
- Expertise and Knowledge: Storm damage restoration requires specialized skills and knowledge. Professionals in the industry undergo extensive training to understand the complexities of different types of damage and have the expertise to undertake restoration effectively. Without such knowledge, homeowners risk overlooking critical aspects of the restoration process, leading to further problems down the line.
- Time and Effort: Storm damage restoration is a time-consuming and labor-intensive process. DIY restoration can be overwhelming, especially for homeowners with limited time or physical capabilities. It involves assessing and documenting damage, coordinating repairs, sourcing materials, and executing the restoration work. Professionals, on the other hand, have the experience and resources to streamline the process, ensuring efficient restoration without burdening homeowners.
- Tools and Equipment: Storm damage restoration often requires specialized tools and equipment to carry out repairs and mitigate further damage. Investing in these tools for a one-time restoration project may not be cost-effective for homeowners. Professionals, however, have access to state-of-the-art equipment and tools specific to storm damage restoration, facilitating a thorough and efficient restoration process.
Professional Storm Damage Restoration
Engaging professional services for storm damage restoration offers numerous advantages that outweigh the DIY approach:
- Expert Assessment: Professional storm damage restoration companies like SERVPRO® provide comprehensive assessments of the damage. Their trained experts can identify both visible and hidden damage, ensuring all necessary repairs are addressed. Professionals have the knowledge and experience to assess the overall structural integrity of the home, preventing potential issues that may arise in the future.
- Efficient Restoration Process: Professionals follow a structured approach to storm damage restoration, ensuring every aspect is addressed properly. They have access to a network of skilled technicians specialized in roofing, plumbing, electrical work, and more. This efficient coordination expedites the restoration process and minimizes disruptions to homeowners.
- Quality Workmanship: Professionals guarantee quality workmanship, backed by warranties and guarantees. Their expertise ensures that repairs are done correctly, reducing the risk of further damage or recurring issues. By using industry-leading techniques and materials, professionals provide a higher level of craftsmanship that may not be achievable through DIY methods alone.
- Insurance Assistance: Handling insurance claims for storm damage can be challenging. Professional restoration companies have experience in working with insurance companies and can assist homeowners in navigating the claims process smoothly. They document the damage thoroughly, provide detailed estimates, and communicate directly with insurance adjusters, ensuring a streamlined and hassle-free experience for homeowners.
In Conclusion
While DIY storm damage restoration may seem tempting, the benefits of professional services should not be overlooked. With their expertise, knowledge, resources, and efficient restoration processes, professionals can handle storm damage restoration more effectively and efficiently. Engaging professional services like SERVPRO not only saves homeowners time and effort but also ensures a thorough assessment and high-quality restoration. Take the time to research and choose a trusted storm damage restoration provider to restore your home to its pre-storm condition safely and effectively.
Preventing Candle Fires in Your Home
4/17/2024 (Permalink)
Candles can create a cozy and calming ambiance in any home, but they also pose a fire hazard if not used safely. Each year, candle-related fires cause damage to homes and personal belongings, leading to the need for fire damage restoration. Preventing candle fires is crucial in safeguarding your property and loved ones. In this blog, we will explore essential tips to help you use candles responsibly and minimize the risk of fire damage in your home.
Never Leave Candles Unattended
One of the most critical safety measures when using candles is to never leave them unattended. Always extinguish candles before leaving a room or going to bed. It only takes a few seconds for an unattended candle to ignite nearby objects, potentially causing extensive fire damage to your home and personal belongings.
Keep Candles Away from Flammable Materials
Ensure candles are placed at least one foot away from any flammable objects, such as curtains, papers, or furniture. Keep in mind that flames can flicker, and it's essential to provide enough space to prevent accidental ignition. By maintaining a safe distance, you reduce the risk of fire damage and smoke damage to your belongings.
Use Sturdy Candle Holders
When selecting candle holders, choose sturdy and non-combustible materials that can withstand the heat of a burning candle. Avoid using flammable materials, such as plastic or wood, as they may ignite and contribute to a fire. Make sure candle holders are stable and will not tip over easily, especially if they are placed on a surface that can be easily bumped.
Trim Candle Wicks
Before lighting a candle, ensure the wick is trimmed to approximately a quarter of an inch. Long or uneven wicks can result in larger flames, causing the candle to burn too hot and increasing the risk of fire. Regularly trimming the wick helps control the burn and reduces the chances of fire damage.
Place Candles in a Draft-Free Area
Avoid placing candles in areas with drafts, as the breeze can cause the flames to flicker and potentially ignite nearby items. Drafts can come from open windows, fans, air conditioning vents, or high-traffic areas. Make sure candles are placed in a stable location where they won't be easily disturbed by air movement.
Use Alternatives to Open Flame Candles
Consider using flameless candles or battery-operated LED candles as a safer alternative to open-flame candles. They provide a similar ambiance without the risk of fire damage. Flameless candles still provide a warm glow and can be a great option for households with pets or small children.
Practice Smart Candle Placement
Choose the location for your candles wisely. Avoid placing candles in areas where children or pets can accidentally knock them over. Additionally, keep candles out of reach of curious hands or wagging tails. Opt for higher surfaces that are not easily accessible.
Enjoying the calming glow of candles in your home can be a delightful experience, but it is essential to prioritize safety to prevent candle-related fires. By following these tips, you can minimize the risk of fire damage to your home and personal belongings. Remember, never leave candles unattended, keep them away from flammable materials, and use sturdy candle holders. Trim the wicks, place candles in draft-free areas, and consider alternatives to open-flame candles. By practicing smart candle usage, you can create a cozy atmosphere without compromising the safety of your home. In the event of a fire, trust the certified professionals at SERVPRO® for comprehensive fire damage restoration, including the restoration of your cherished personal belongings.
 24/7 Emergency Service